Blender3D AE Plexus Style Wireframe Render.

I was trying to achieve a wireframe render style similar with AfterEffect plugin, Plexus using Blender3D. The result I got so far is not bad but still can't compare to the real thing. In brief, this is done by using DupliVerts, and wireframe material. Freestyle can be use too, but it will have longer render time.
Blender3D Plexus Wireframe Effect
Below is a compilation of test shot I did using Blender3D internal render. Scroll down for tutorial!First Step
I can't find a way to render the main mesh when using DupliVerts, so I am using two mesh objects with link mesh data. One mesh using DupliVerts for the circle effect to appear near vertex, another mesh using wireframe shader.- Add / model your main object (cube in this case)
- Select the cube and ALT-D to duplicate it. ALT-D is use instead of SHIFT-D because we want both cube to share the same mesh data for displacement animation later.
For now, we will refer them as First Cube and Second Cube.
Adding circle/sphere at vertex for First Cube
There are two methods we can add circle near vertex.- DupliVerts - Can be any shape as it is base on mesh. This is the prefer method.
- Halo Shader - Only Halo / Circle Shape.
Using DupliVerts
To add circle near vertex of mesh, we can use DupliVerts under object settings.
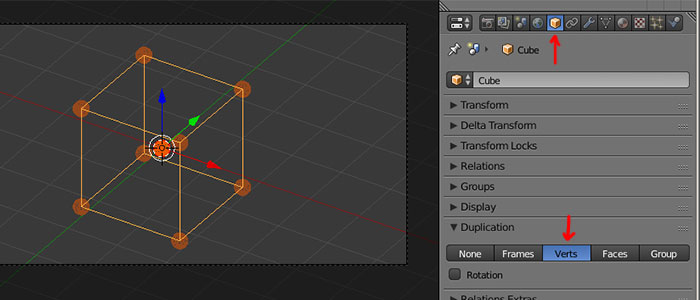
- Add a sphere (or any shape to appear near vertex) to the scene (SHIFT-A)
- Select the cube. Go to object settings > Duplication > Enable Verts (Refer to image above)
- Select the sphere (RIGHT CLICK), then shift select (SHIFT RIGHT CLICK) the cube. Apply parent (CTRL-P)
- Sphere should be place automatically near all the vertex of the cube. Resizing the sphere will resize all the duplicates that are place near vertex.
More info can be read in this Blender3D wiki about DupliVerts.
Using Halo Shader
Not recommend this method as we want the mesh to use wireframe shader later, instead of halo shader. But using Halo Shader to place circle at vertex is by just setting the material to halo shader. Then adjust the Alpha, Hardness and Size settings.
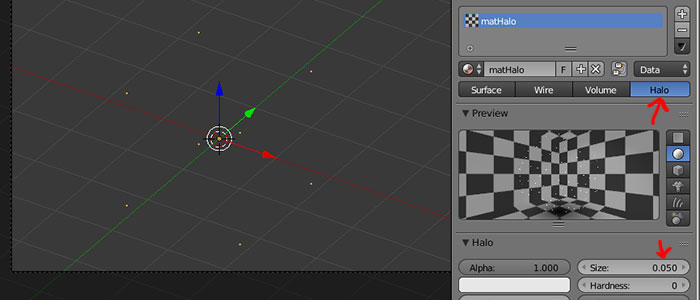
- Size self explanatory, control the size
- Alpha 1 is opaque, 0 is transparent
- Hardness Value bigger than 0 will have soft edge, 0 render hard edge halo
Wireframe Render For Second Cube
There are two methods we can render the wireframes line.- Wireframe Shader - Fast render, limited line style. This is the prefer method, due to speed in rendering.
- Freestyle line render - More flexible on line style, but will be slower in rendering if use in high poly scene.
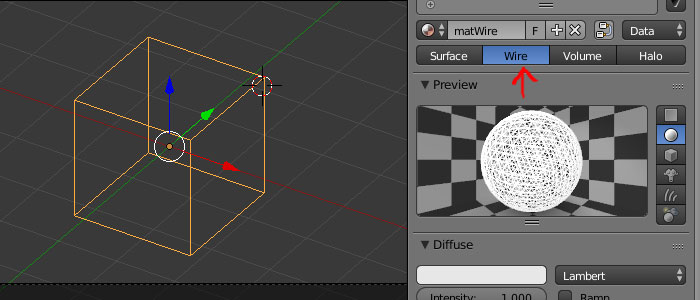
Using Wireframe Shader
Using wireframe shader is prefer since it render fast. Enable them in material tab. Some value you might want to change is diffuse colour, transparency and emit shading.
Using Freestyle Line Render
Freestyle offer more line settings to play with at the cost of slower render speed.
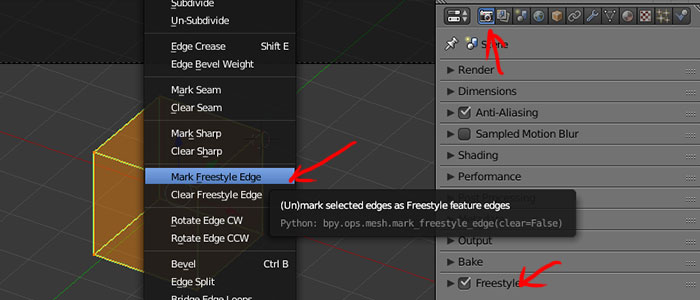
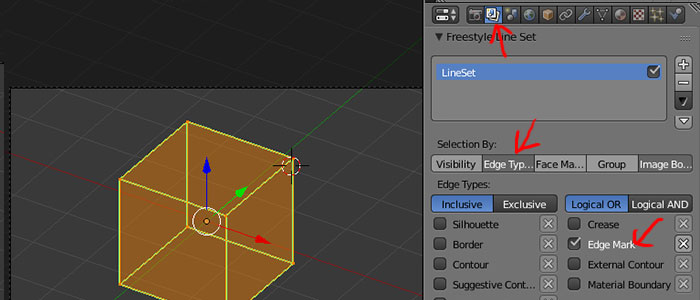
- Enable Freestyle render settings in Render Tab
- Select the cube. Press TAB to enter EDIT MODE
- Select everything (A). Then CTRL-E > Mark Freestyle Edge
- Under Render Layer Tab, Enable Edge Mark for Freestyle settings. You can turn off Selection By Visiblity if you want to render the lines at the back.
Compositing
If we render both cubes now, we will get this wireframe effect similar with Plexus plugin.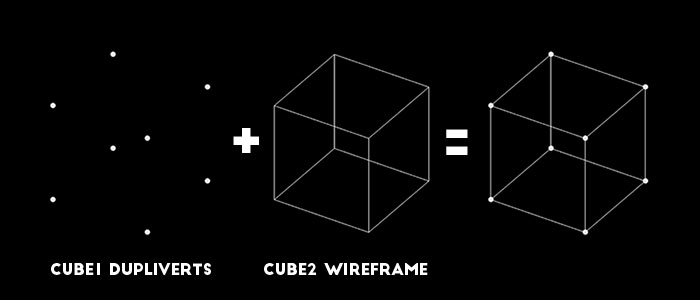
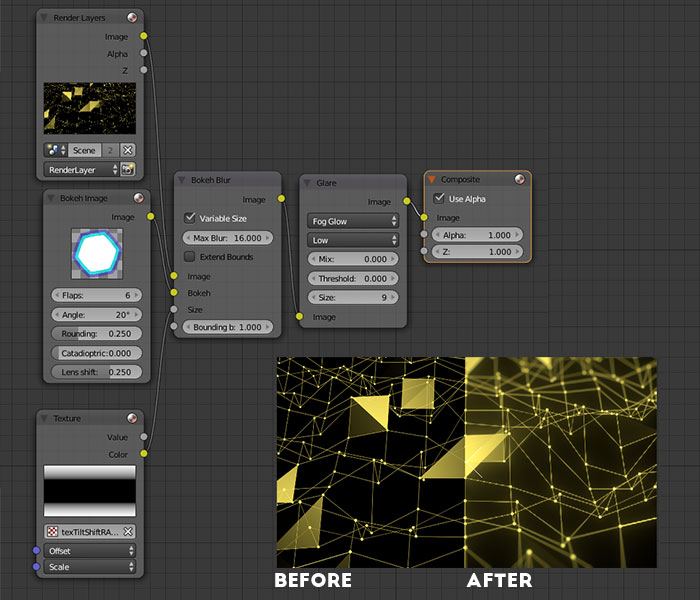
But this still look kind of plain. So enable compositing nodes, and add in Tilt Shift and Glow Effect for it. Below is the render node tree I use.
Glow Effect
Glow effect can be achive easily with Glare node with Fog Glow option.
Tilt Shift Effect
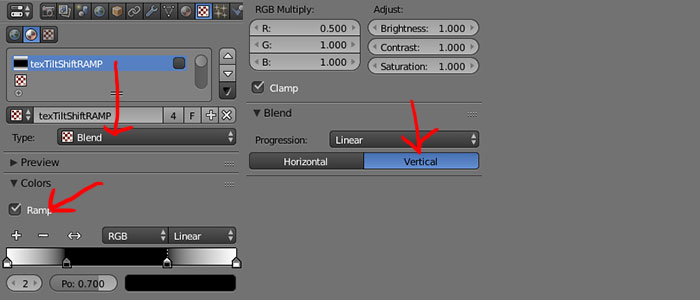
Tilt Shift effect can be achieve using Bokeh Blur node and input a color ramp into it blur size. The color ramp can be done inside Blender using procedural blend texture.
Vertex Animation
For wiggly vertex animation, we will use the Displace modifier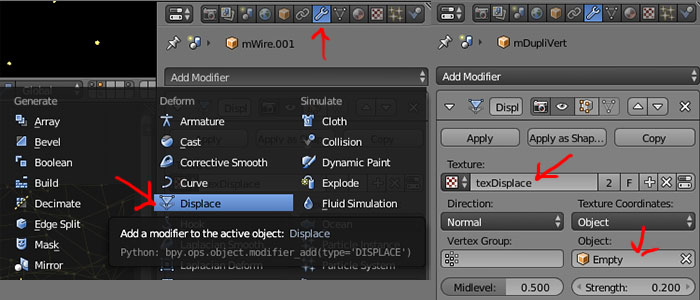
- Go to Modifier Tab, Add Modifier, Select Displace
- Under Texture. Add a new texture, go to texture tab and choose Clouds.
- Under Texture Coordinates. Choose Object from the dropdown list.
- Add an Empty Object into the scene (SHIFT-A > Empty)
- Under Object. Choose the Empty we just add to the scene.
- The vertex will now displace differently as you move the Empty into different location.
Since we are using two Objects, First Cube and Second Cube. So remember to add the same Displace modifier for both cube.

Download
I have uploaded a sample blend file to blendswap but still in modertation queue. You can download the blend in this link, Fake Plexus WireframeReference
Youtube Blender3D Plexus Wireframe EffectVimeo Blender3D Plexus Wireframe Effect


Good tutorial . Thank's
ReplyDelete